If you have braces, you know the drill. Dinner is over. You go to the bathroom. You pull out a piece of floss. You thread it through a threader. You poke it under the wire. You floss one tooth. You pull it out. You repeat the process… 28 times.
It takes 20 minutes, your fingers hurt, and let’s be honest most nights, you just skip it.
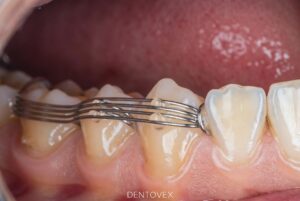
But skipping flossing with braces is dangerous. It leads to puffy gums (gingivitis) and permanent white spots.
Enter the Water Flosser (also known as an Oral Irrigator). It uses a pressurized stream of pulsating water to blast away plaque and food debris from between teeth and around brackets. It’s fast, it’s effective, and it actually feels good.
In this guide, we break down why every orthodontic patient needs one, and how to choose the best model for your lifestyle in 2026.
1. Water Floss vs. String Floss: The Verdict
Is water really better than string?
- String Floss: Still the “Gold Standard” for scraping sticky plaque off the side of the tooth.
- Water Floss: Superior for flushing out food debris, massaging gums, and reaching deep pockets that string can’t reach.
The Orthodontist’s Advice: ideally, you should do both. But if you are going to skip string floss because it’s too hard, using a water flosser is infinitely better than doing nothing. A study published in the Journal of Clinical Dentistry found that water flossers combined with manual brushing were 3 times more effective at removing plaque around braces than brushing alone.
2. Key Features to Look For (Buyer’s Guide)
Not all water flossers are created equal. Before you buy, check for these 3 “Must-Have” features for braces:
A. The “Orthodontic Tip”
This is non-negotiable. Standard tips are fine, but an Orthodontic Tip has a tapered brush on the end. It allows you to scrub the bracket while the water flushes it out. Make sure the model you buy includes this specific attachment.
B. Variable Pressure Settings
Your gums might be sensitive after an adjustment. You need a device that lets you dial the pressure down to “Low” (Soft) and crank it up to “High” when you need a deep clean. Look for models with at least 3 pressure modes.
C. Water Capacity
- Countertop Models: Hold enough water for 90+ seconds of cleaning. (Best for home).
- Cordless Models: Hold water for ~45 seconds. You might need to refill it halfway through. (Best for travel/school).
3. Cordless vs. Countertop: Which is Right for You?
1. The Countertop Workhorse (e.g., Waterpik Aquarius)
- Pros: Powerful motor, huge water tank, multiple tips included, no batteries to charge.
- Cons: Takes up counter space, needs to be plugged into an outlet.
- Best For: The master bathroom and daily deep cleaning.
2. The Portable Cordless (e.g., Waterpik Cordless Advanced)
- Pros: Waterproof (use it in the shower!), travel-friendly, compact.
- Cons: Less power than countertop, small tank (needs refilling), battery life degrades over years.
- Best For: Students, travelers, and small apartments.
4. How to Use It Correctly (Don’t Make a Mess!)
First-time users often spray water all over the mirror (and themselves). Here is the splash-free technique:
- Fill the Tank: Use lukewarm water. Cold water can shock sensitive teeth.
- Lean Over the Sink: This is crucial. Look down into the sink, not at the mirror.
- Place Tip in Mouth: Put the tip in your mouth before turning the unit on.
- Lips Partially Closed: Close your lips enough to prevent splashing, but let the water drool out of your mouth into the sink.
- Trace the Gumline: Aim the stream at a 90-degree angle to the gumline. Pause briefly between each tooth and trace around the bracket.
- Done in 60 Seconds: That’s all it takes to clean the whole mouth.
5. Can I Put Mouthwash Inside?
Yes! For an extra antibacterial boost, you can mix a little non-alcoholic mouthwash with the water in the tank. This helps freshen breath and kill bacteria deep between the teeth. Tip: Run a cycle of plain water afterwards to rinse the internal pump and prevent stickiness.
Conclusion: An Investment in Your Smile
A good water flosser costs between $40 and $100. Compared to the thousands you are spending on braces, this is a small investment to ensure your gums stay healthy and your treatment finishes on time.
Once you feel that “fresh from the dentist” clean sensation, you will never want to go back to just brushing.
Ready to upgrade your routine? Don’t forget to pair your water flosser with the right toothpaste. Check out our guide on The Best Toothpaste for Braces.
Disclaimer: Dentovex is reader-supported. We do not manufacture these products. Always consult your orthodontist for specific product recommendations.
Disclaimer: This article is for informational purposes only. Treatment plans for missing teeth vary highly based on bone structure. Consult a specialist for a personalized plan.
This article has been compiled and presented by Dentovex Orthodontics – Research Group for educational purposes only. It is not intended as medical advice and should not replace a face-to-face consultation with a licensed dentist, orthodontist, or other qualified healthcare professional. Always seek the advice of your own clinician regarding any questions or concerns about diagnosis, treatment, or health conditions.


No responses yet